How to install Doom on the Raspberry Pi

My kids were intrigued by what I was doing as I followed this SparkFun tutorial on how to install Doom on the Raspberry Pi, they were making questions and seem so motivated that I asked if they wanted to do it themselves, they accepted right away.
Although the instructions are good, they are a little outdated and some steps can be simplified. I decided to improve them and post them here.
List of hardware
- Raspberry Pi model B
- SanDisk SDHC 16 GB class 4 memory (all the software requires less than 2 GB)
- Logitech K120 USB keyboard
- USB micro cable
- USB mouse
- Ethernet cable
In case of problems with the peripherals, there’s a list of compatible hardware and a separate list for the SD cards.
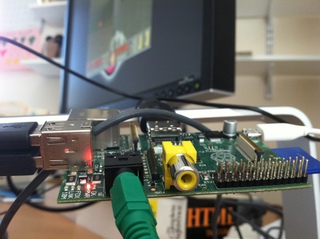
There’s also a quick start guide with instructions on how to connect all the components.
Download Arch Linux ARM image
Download the Arch Linux ARM image from the Raspberry Pi website (scroll down to the Arch Linux ARM section).
I wasn’t able to get the .zip file with the direct download and had to get a BitTorrent client from here. Once installed, just click the archlinux-hf-2013-02-11.zip.torrent link on the browser and it will open the BitTorrent client for you. The file is 200 MB and it took 8 minutes to download with my connection.

Write Linux image to SD card
These are instructions for the Mac, for other operating systems look here
These commands and actions need to be performed from an account that has administrator privileges.
(Optional) Verify if the the hash key is the same, in the terminal run this command and compare the long sequence of characters against the SHA-1 field below the link you just clicked (at the time of writing this post it was 1d2508908e7d8c899f4a5284e855cb27c17645dc)
$ shasum ~/Downloads/archlinux-hf-2013-02-11.zip
Extract the image:
$ unzip ~/Downloads/archlinux-hf-2013-02-11.zip
this will create file called archlinux-hf-2013-02-11.img in the current directory
From the terminal run df -h you’ll get something like this:
Filesystem      Size   Used  Avail Capacity Mounted on
/dev/disk0s2   698Gi   89Gi  609Gi    13%   /
devfs          186Ki  186Ki    0Bi   100%   /dev
map -hosts       0Bi    0Bi    0Bi   100%   /net
map auto_home    0Bi    0Bi    0Bi   100%   /home
Insert the SD card, run df -h again and look for the new device that wasn’t listed last time. Record the device name of the filesystem’s partition, in my case it was /dev/disk2s1
Filesystem      Size   Used  Avail Capacity Mounted on
/dev/disk0s2   698Gi   89Gi  609Gi    13%   /
devfs          186Ki  186Ki    0Bi   100%   /dev
map -hosts       0Bi    0Bi    0Bi   100%   /net
map auto_home    0Bi    0Bi    0Bi   100%   /home
/dev/disk2s1    15Gi  2.3Mi   15Gi     1%   /Volumes/NO NAME
Unmount the partition so that you will be allowed to overwrite the disk, you need to enter your password
$ sudo diskutil unmount /dev/disk2s1
Using the device name of the partition work out the raw device name for the entire disk, by omitting the final “s1” and replacing “disk” with “rdisk” (this is very important: you will lose all data on the hard drive on your computer if you get the wrong device name). Make sure the device name is the name of the whole SD card as described above, not just a partition of it (for example, rdisk2, not rdisk2s1. Similarly you might have another SD drive name/number like rdisk2 or rdisk4, etc. – recheck by using the df -h command both before and after you insert your SD card reader into your Mac if you have any doubts!):
In our case, the partition is /dev/disk2s1 then the device is /dev/rdisk2
In the terminal write the image to the card with this command, using the raw disk device name from above (read carefully the above step, to be sure you use the correct rdisk# here!):
$ sudo dd bs=1m if=./archlinux-hf-2013-02-11.img of=/dev/rdisk2
This command will take around 4 minutes and will not feedback any information until there is an error or it is finished, in my case this is what I got back:
1850+0 records in
1850+0 records out
1939865600 bytes transferred in 229.546995 secs (8450843 bytes/sec)
Before taking the card out you must eject it with this command:
$ sudo diskutil eject /dev/rdisk2
Put the SD card into the Raspberry Pi. Connect your display, keyboard, mouse, ethernet cables to the Pi. Lastly, connect power through the micro USB cable. The Pi should boot up Arch Linux ARM and get to the log-in screen.
Log in with login: root and password: root
Important
If at any time you want to cut the power to the Pi you must first shut it down. This is the command to do it:
$ shutdown -h now
System configuration
Login as root.
Change root password:
$ passwd
Edit the locale.gen file. All you need to know about the nano editor is here
$ nano /etc/locale.gen
Search for this line and make sure it’s uncommented, i.e. there’s no leading #
en_US.UTF-8 UTF-8
Generate locales:
locale-gen
To define your local timezone, find your region or country under this directory:
$ ls /usr/share/zoneinfo
Then find the file that best represents where you live inside that region, in my case:
$ ls /usr/share/zoneinfo/America
Using the full path create a symbolic link:
$ ln -sf /usr/share/zoneinfo/America/New_York /etc/localtime
When the system displays the date, it should contain the correct timezone:
$ date
Sun May 18 13:25:46 EST 2013
Using nano make sure the file /etc/locale.conf contains these 2 lines:
LANG=en_US.UTF-8
LC_COLLATE=C
Define the name for your RPi:
$ nano /etc/hostname
Change alarmpi to doom or any name containing only lower case letters and numbers.
Modify /etc/hosts, look for the line 127.0.0.1 localhost.localdomain localhost
$ nano /etc/hosts
Add at the end of that line the same name you used under /etc/hostnanme:
127.0.0.1 localhost.localdomain localhost doom
Full system update
Verify that your Pi is connected to the Internet through the Ethernet port and login as root. If you forget to connect it’s better to reboot with shutdown -r now and login again.
The package manager in Arch Linux is called pacman, perform a full system update by issuing this command (note this is a capital S).
$ pacman -Syyu
Once you provide confirmation, it will take several minutes (20 in my case) to download and install the software. Once complete, run this to verify the update was successful:
$ pacman -Syu
It should report nothing to do.
Install sudo and create a user account
The sudo command allows regular users to perform operations that require root priviledges. Install sudo:
$ pacman -Sy sudo
Allow users to run sudo:
$ EDITOR=nano visudo
Uncomment (take away the #) from the line that says: %wheel ALL=(ALL) ALL. Save and exit.
Create a regular user login (change mary for the desired user name, and assign it a password:
$ useradd -m -g users -G audio,lp,optical,storage,video,wheel,games,power,scanner -s /bin/bash mary
$ passwd mary
Reboot Pi:
$ shutdown -r now
Log back in with the user and password you just created.
Install sound drivers
Login as the newly created user.
Install Advanced Linux Sound Architecture (Alsa), required for sound:
$ sudo pacman -Sy alsa-firmware alsa-utils
The Pi has 2 audio outputs: HDMI and analog. If you have an HDMI monitor without sound capabilities, but have old fashioned speakers connected to the analog port, the audio won’t work. This forces the Pi to use the analog output and sets volume to maximum:
$ amixer cset name='PCM Playback Route' 1
$ amixer cset name='PCM Playback Volume' 100%
To test the audio execute this command. It will play a “beach” sound that alternates between the left and right speakers.
$ speaker-test -c 2
To stop the test hit Control-C.
If you have trouble setting the audio this article can help.
Important
Remember that you must shutdown before cutting power to the Pi, because you’re logged in as a regular user you must run the command using sudo: ‘sudo shutdown -h now`
Install video drivers
Install Xorg, pre-requisite for GUI apps
$ sudo pacman -Sy xorg-server xorg-xinit xorg-utils xorg-server-utils
Install Xorg framebuffer video driver:
$ sudo pacman -Sy xf86-video-fbdev
Install Openbox and Xterm
Install Openbox and configuration utilities
$ sudo pacman -Sy openbox obconf obmenu lxappearance
Make initial configuration files for your Openbox user:
$ mkdir -p ~/.config/openbox
$ cp /etc/xdg/openbox/menu.xml ~/.config/openbox
$ cp /etc/xdg/openbox/rc.xml ~/.config/openbox
Create/Modify user’s .xinitrc file
$ nano ~/.xinitrc
Add the following line to this file:
exec dbus-launch openbox-session
Before starting Openbox for the first time, let’s install a terminal:
$ sudo pacman -Sy xterm
Check to see if Openbox works now:
$ startx
This is the graphical interface. All you see is an empty screen with a gray background. Right-click and a menu will pop-up. Select Terminals and then Xterm. This will open the same terminal you’ve been using, but inside a window.
If you want to exit the GUI select Log Out from the pop-up menu.
Desktop background
In the terminal window we just opened type the following command, it will install feh, an image viewer.
$ sudo pacman -Sy feh
Make a directory for your background, then go to it:
$ mkdir ~/wallpapers
$ cd ~/wallpapers
Find a wallpaper on the net then download with wget:
$ wget http://carreno.me/pi_wallpaper.jpg
Set your wallpaper (make sure to change destination to actual username and filename):
$ feh --bg-scale /home/mary/wallpapers/pi_wallpaper.jpg
To make your desktop load when starting Openbox, modify file autostart:
$ nano ~/.config/openbox/autostart
Add line:
$ sh ~/.fehbg &
Install programming environment
Install the base development package so you can compile C programs:
$ sudo pacman -Sy base-devel
This installs gcc and make plus other useful tools you may need for development.
Install Python 3 (python) or Python 2.7 (python2)
$ sudo pacman -Sy python python2
Install DOOM
Install chocolate-doom. Chocolate-doom is a shareware port for running DOOM game files (.wad files).
$ sudo pacman -Sy chocolate-doom
Get shareware wad file for playing DOOM demo (you can also use your full game .wad files if you own the game, I tested the Doom II wad file and it works fine):
$ cd /usr/share/doom
$ sudo wget http://www.jbserver.com/downloads/games/doom/misc/shareware/doom1.wad.zip
Unzip the file, but first install the zip/unzip utilities:
$ sudo pacman -Sy zip unzip
$ sudo unzip doom1.wad.zip
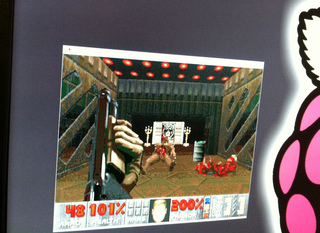
Run DOOM!!!!
$ chocolate-doom -iwad /usr/share/doom/DOOM1.WAD -window
Forget the -window if you want full screen but it will run slower. The smaller the window, the less math the GPU has to do.


7 comments
Joe June 15, 2013
How do you stop the speaker-test when installing the sound drivers?
Braulio June 16, 2013
Hit Control-C
Franck August 22, 2013
Hi,
Very cool article, thanks.
If you want to try out a version of chocolate doom that makes use of the GPU of the Raspberry Pi, you may want to download our version available on the Pi Store : http://store.raspberrypi.com/projects/chocodoom
It is free and a straight / faithful port of Chocolate Doom.
Have Fun,
Franck
Braulio August 22, 2013
Hi Franck,
This looks very interesting, I'm going to try it as soon as I can. Can't wait to see how faster it feels.
Thank you very much for the reference.
Brian Wallace May 20, 2014
Won't work now (2014)
sudo apt-get install prboom freedoom 0.7-1
Makes the links and sets up the menu as well, 'doom' should run (/usr/games$ doom).
Brian Wallace May 20, 2014
Seems that's Raspbarian that doesn't do the older Chocolate Doom, but does prboom (the current version for doom and like games).
Braulio May 21, 2014
Thanks Brian. I'll check prboom out. Hopefully I'll find the time to also update these instructions.